- Vrealmatic
- Unreal Engine Wiki
- Skeletal Animation
Working with Sound in Unreal Engine
How to work with Animation(s) in the Unreal Engine?
Skeleton for Character Animations
A skeleton is the basic building block of a character and as such it binds the total visual characteristics - the skeletal mesh as well as animation.
There's possible to have many Skeletal Meshes (= visuals) that uses the same skeleton. As the skeleton moves, the binded mesh moves as well. The movement (animation) of the skeleton itself is defined through an Animation Sequence that defines exact relative possition of each skeleton's joint in a give timeframe.

As the Skeletal mesh as well as animations rely on the Skeleton itself, these assets are replaceable till they still share the same Skeleton. In other words, there's possible to share animations between various skeletal meshes.
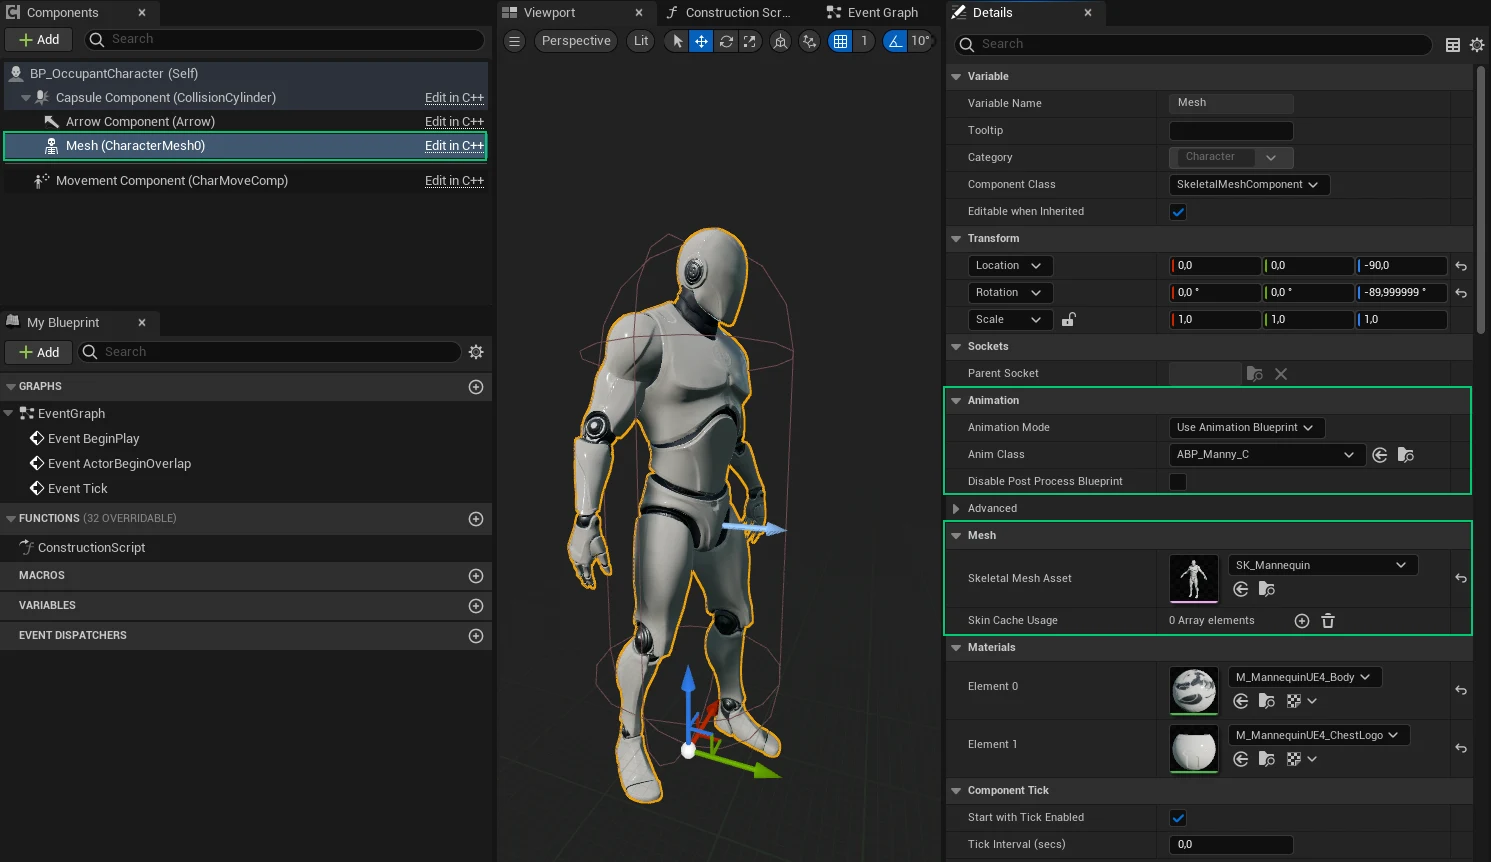
In the practice, they both Skeletal Mesh and selected type of animation are connected together throught the Mesh component at Blueprint Character class as shown below:
Animation assets
All animation assets can be displayed in the Content Window by Applying Animation filter. There are various types of animations in the Unreal Engine:
- Animation Sequences - Allows to check & set animations (joints position) on the frame basis
- Animation Blueprint
- Blend Space
Animation Blueprint (ABP)
The main purpose of the Animation Blueprint is to bring together all the animation logic and allow to blend, merge and switch between animations based on the variables values that are controlled by the game itself.
Event Graph and Anim Graph tabs in Animation Blueprint
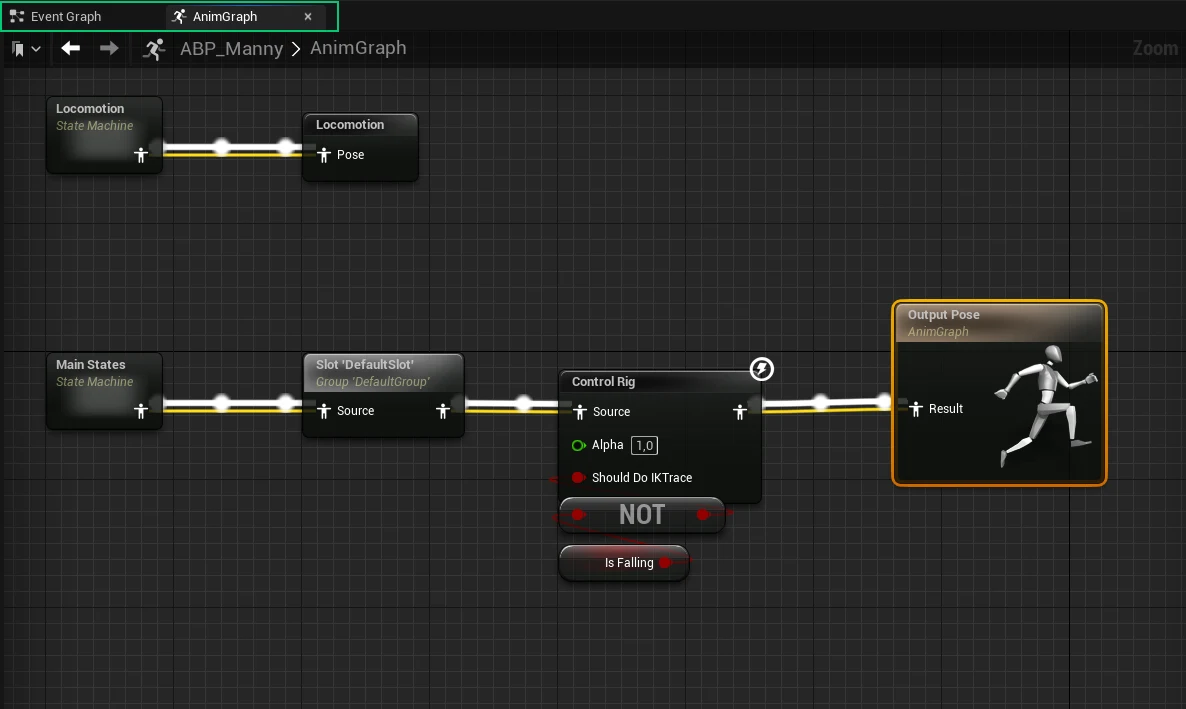
- Event Graph is a regular Blueprint environment that serves for calculating and setting variable values.
- Anim Graph serves for setting logic for blending animations together based on series of variables defined and updated in the
Event Graph.
Creating an Animation Blueprint
Animation Blueprint can be created by pressing right mouse button in the Content Drawer → Animation → Animation Blueprint.
Each Animation Blueprint requires to select Skeleton (either directly, throught a template or through the parent class). As already mentioned - each animation is tightened to the defined Skeleton. Thanks to that, the crated Blueprint Animation will be compatible with any Skeletal Mesh using the same Skeleton.
Name the newly created Animation Blueprint with the ABP_ prefix.
Setting Anim Graph in Animation Blueprint
Anim graph allows to inser animation sequences as a source node and then work with them through pre-defined action nodes, such as:
Blend= blending 2Animation Sequencesbased on the inputfloatvalue Alpha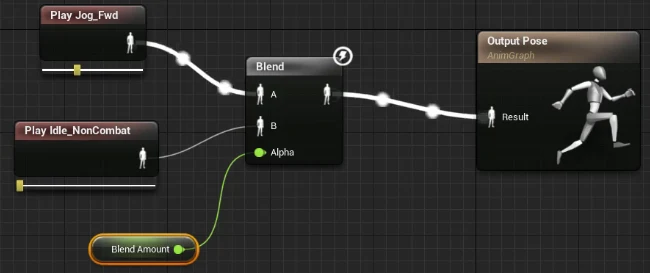
Blend Poses by bool= Allows to change an animation sequence based on changed boolean state (e.g. checkbox dead for dead animation)
State Machine BP node
Switching between various kind of movement, such as walking, swimming... is possible with Blueprint Animation called State machine. It's available right in AnimGraph, on right mouse button click and selection of Add New State Machine node. Within the node, there's possible to add States that represents a kind of movement. Each state contains own Output Animation Pose for certain movement animation. Once there is more states defined, there's possible to define transitions between them. Each transition has then own Result output pin that is controlled based on declared variables through Can Enter Transition input pin.
Animation Blend Space (BS)
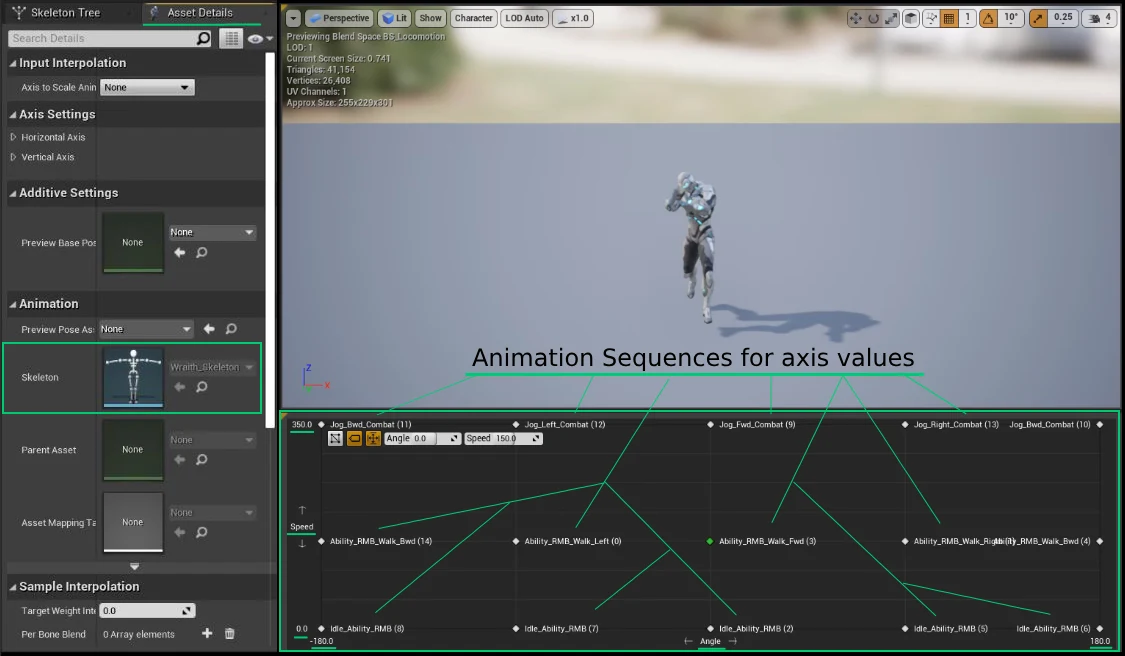
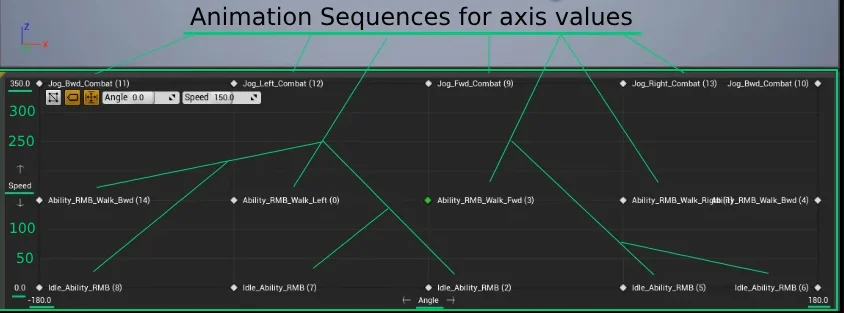
Blend Space is an another way of blending animation sequences in the Unreal Engine. While 1 Dimensional variant is optimal for blending just a few aniimations, 2-dimensional variant allows us to blend many animations together in much clearer way than doing it through the Animation Blueprint. 2D Blend Space below includes a bunch of blended animations placed the grid space with declared axis values.
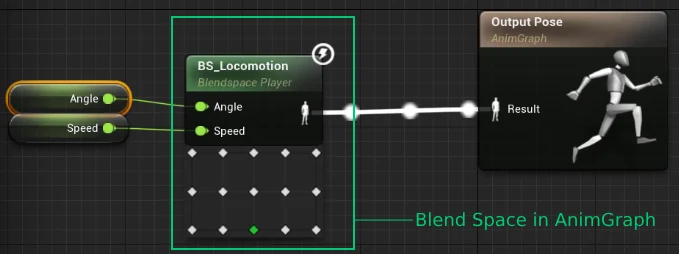
It's worth to mention, that it's not of selecting either Animation Blueprint or Blend Space when dealing with the animations - the ideal way is to use them in the combination - use Blend Space output as an input node in the Animation Blueprint.
There's also Blend Space for aiming callled Aim Offsets (AO).
Creating an Animation Blend Space
Animation Blend Space can be created by pressing right mouse button in the Content Drawer → Animation → Blend Space while we can choose from the 1 and 2 Dimensional Blend Space variant.
Blend Space- works with 2 axis (= allows forward, backward, right and left dimension)Blend Space 1D- works with 1 axis (= allows only forward, backward / right, left dimension)
Each Blend Space requires to pick a Skeleton. As already mentioned - each animation is tightened to the defined Skeleton. Thanks to that, the crated Blend Space will be compatible with any Skeletal Mesh using the same Skeleton.
Name the newly created Blend Space with the BS_ prefix.
Blend Space Asset Details Tab
- Axis Settings - Allows to set name, scale (min/max value), grid (accuracy) and interpolation for the axis
Calculating Animation Speed
Each character's animation sequence has defined length and time of a step. If this movement speed of the animation does not correspond with the character's movement in the world space, there's visible "foot sliding" between the ground and character's foot. To avoid that, these speeds must to be synchronized.
Animation Speed calculation
For any Animation Sequence we can calculate the movement speed as follow:

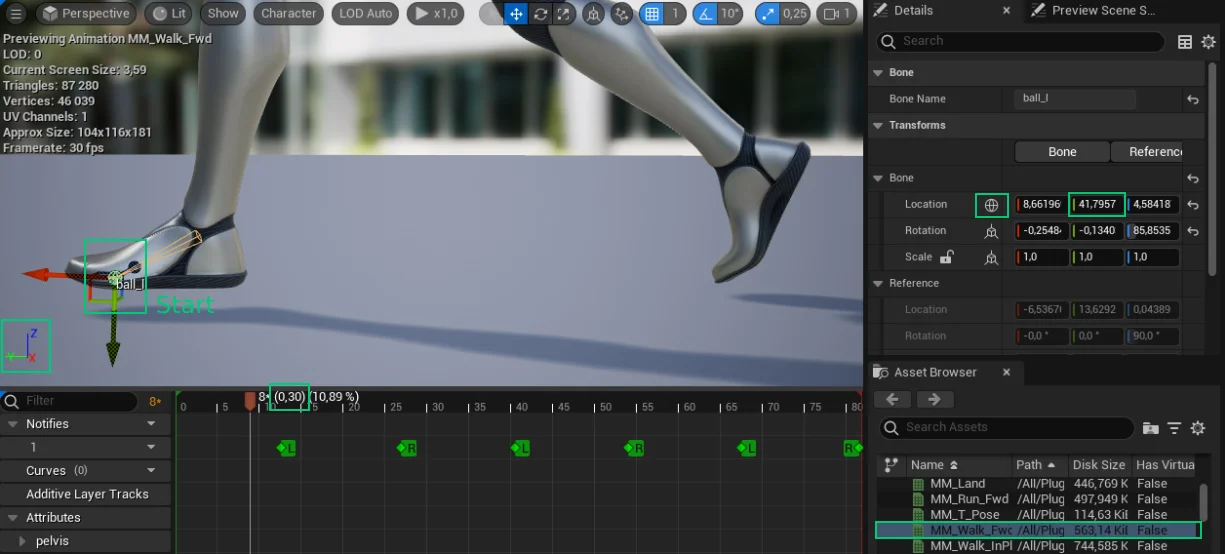
- Choose a certain foot point on the skeleton in Animation Sequence viewer
- Read value of time and world location of that point at the start of the step. At the example above, t0 = 0.30s and Y0 = 41,7957 cm
- Read value of time and world location at the end of the step. At the example above, t1 = 0.67s and Y1 = -47.936356 cm
- Based on the read values, calculate distance and time. In the case above, it's
t = t1 - t0 = 0,37sand Y=Y1-Y0 = -89,732 cm for the tracked walk animation. Based on that values, the speed isv = |Y| / t = 242.519 cm / s - Make this calculation for all animation sequences you are going to use in the blend space
- Design Axis Settings in Blend Space grid to allow you to place calculated animations to grid values coresponding with their value.
- Round counted values e.g. for 50
- Set
Number of Gridbased on the maximum value - If maximum value is 400 and rounding by 50, there would be 400 / 50 = 8 Grid lines. - Place animations on the grid line coresponding with its speed.
Once set, Unreal Engine will automatically interpolate animation speed between various animations within the range defined by the Blend Space.
Slowing Down Animations with Blend Space
Connecting Animation to Gameplay
The animation should reflect real movement of the character. Animation is being processed through the Animation Blueprint that can be assigned to any BP_Character through the Animation settings.
- Animation Mode: Use Animation Blueprint
- Anim Class: Select Animation Blueprint
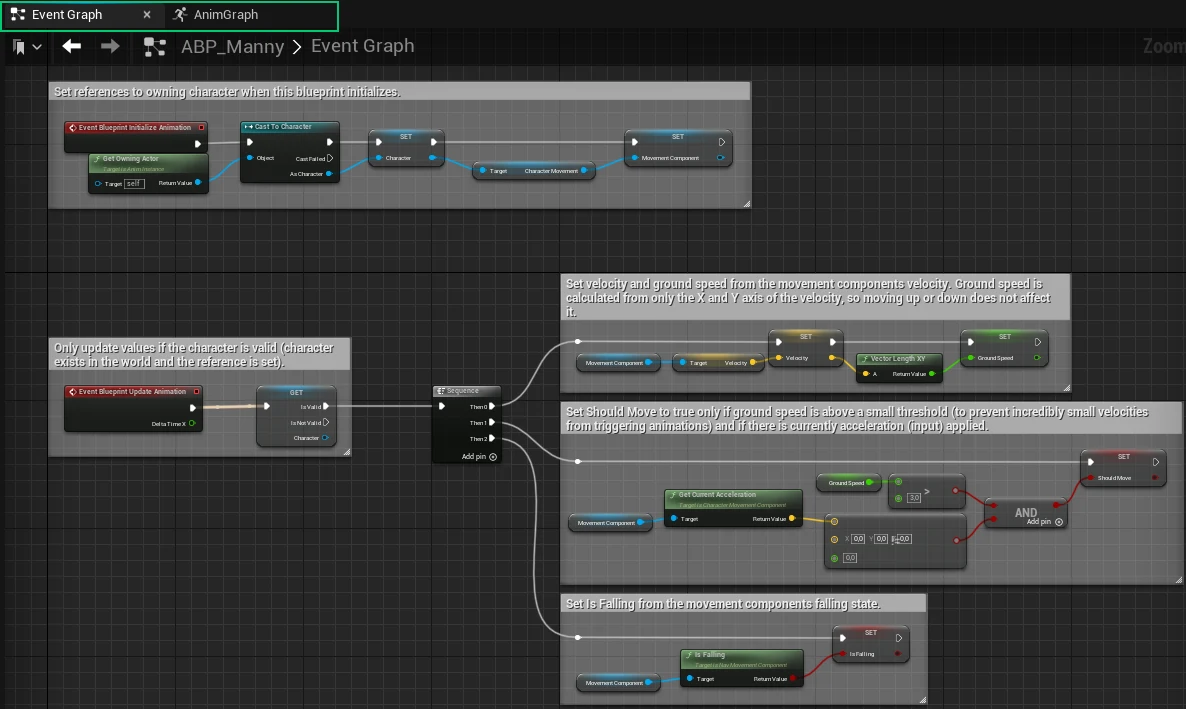
The connection of the BP Character with the Animation Blueprint is done through the EventGraph in the Animation Blueprint, as it uses some kind of Get Owner BP Node.

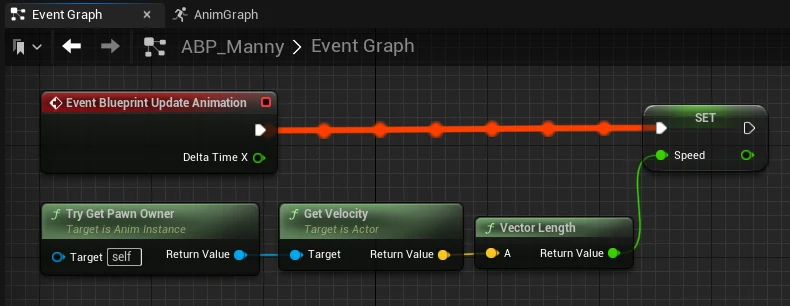
Animation Blueprint could be considered as an layer that take care about animations itself. It runs own Tick function called Event Blueprint Update Animation within which it calculates and checking values based on which the animations are being driven.
Through the Event Blueprint Update Animation event there's possible to update the animation speed based on the real Character movement (e.g. when there's variable float axis input value going from the gamepad), switching between animation sequences based on the state (live / dead) taken from game and many more.
When working with an angle of looking within tanimation that works with the World Space, there's need to apply transform conversion from World To Local space to process always animation for the direction the Character really moves.
As of the Get Velocity BP node returns a value in Global Space, there's need to convert it to the Local Space. As there's known Global Space Transform from the Get Velocity Node BP node, we can do the convserion from Global to Local transform by using Inverse Transform. Unreal Engine has 2 such nodes:
Inverse Transform Direction- only applaying the rotation and scaleInverse Transform Location- applying all and moves the position around
In a case of Angle, Inverse Transform Direction does exactly what's required.

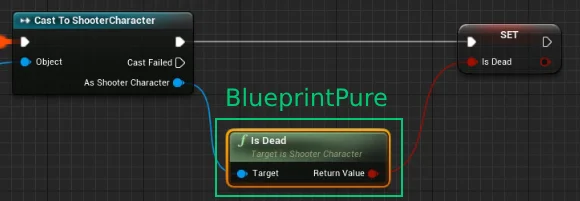
Blueprint Pure Node UFUNCTION(BlueprintPure)
Animations in Animation Blueprint are driven through ABP EventGraph with own variables. If there's need a state from the world for the animation (such as a character died - play dead animation sequence), there's possible to create a Node through which the Animation Blueprint will have access to the desired state.
Because of the only purpose of such node is to output a value without changing anything, such node does not need any execution pin. That means, it may be a BlueprintPure node with a const function behind the node. Pure node does not have an execution pin. As so, it's generally a const function that just return a state without doing any change.
// .h file
UFUNCTION(BlueprintPure)
bool IsDead() const;

// .cpp file
bool AExampleClass::IsDead() const
{
	return Health <= 0;
}