NAT configuration on Mikrotik Router
No matter which MikroTik router you have, its operating system and the administrative interface, RouterOS, are always the same. This wiki page describes the function and settings of NAT.
What is NAT?
NAT (Network Address Translation) is a function commonly used in network devices. This feature allows multiple devices in a local network (LAN) to share a single public IP address for internet access.
What are the main purposes of NAT?
- Conservation of public IP addresses:NAT allows multiple devices to use one public IP address, thus reducing the need for multiple public IP addresses (without NAT, each device connected to the internet would need a unique public IP address). This is particularly important in the era of IPv4, where the number of available public addresses is limited.
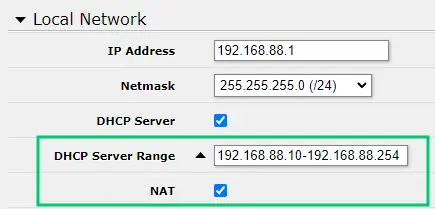 Quick local network setup at http://192.168.88.1/webfig/#Quick_Set. An active DHCP server ensures that connected computers will automatically be assigned an IP address (from the specified range of addresses).
 - Security: NAT provides a level of security by hiding the internal IP addresses of devices in the local network from the external world. This makes it harder for potential attackers to identify and directly access individual devices on the network.
- Simplification of network management: NAT simplifies network management by separating the internal network structure from the external internet environment. This allows network administrators to change internal addresses without needing to adjust settings on the public internet.
Where can I find NAT rules in RouterOS?
- In terminal:
/ip/firewall/nat. List with the commandprint. - In Webfig/Winbox: section
IP→Firewall→ tabNAT, or at the Webfig URL http://192.168.88.1/webfig/#IP:Firewall.NAT.
Adding a NAT rule in RouterOS
- In the
NATtab of theIP/Firewallmenu, click the "Add New" or "+" button to create a new rule. - Before making configuration changes, consider activating
Safe Mode. - Configuration of a typical rule might look like this:
- Chain: Choose "srcnat" for source NAT (for internet traffic leaving your network) or "dstnat" for destination NAT (for incoming traffic).
- Out. Interface: Select the external interface (e.g., WAN) for srcnat rules.
- Action: Set to "masquerade", which is a commonly used type of NAT for sharing the internet.
- Additional settings: You can specify source IP addresses, ports, and other conditions as needed by your network, for example:
- For IP aliasing (multiple public IP addresses on one LAN cable), specify the range of IP addresses to be assigned to a specific public IP in
Src. Address. In this case, chooseActionassrc-natand insert the public IP address used for the specific range of IP addresses into theTo Addressesfield.
- For IP aliasing (multiple public IP addresses on one LAN cable), specify the range of IP addresses to be assigned to a specific public IP in
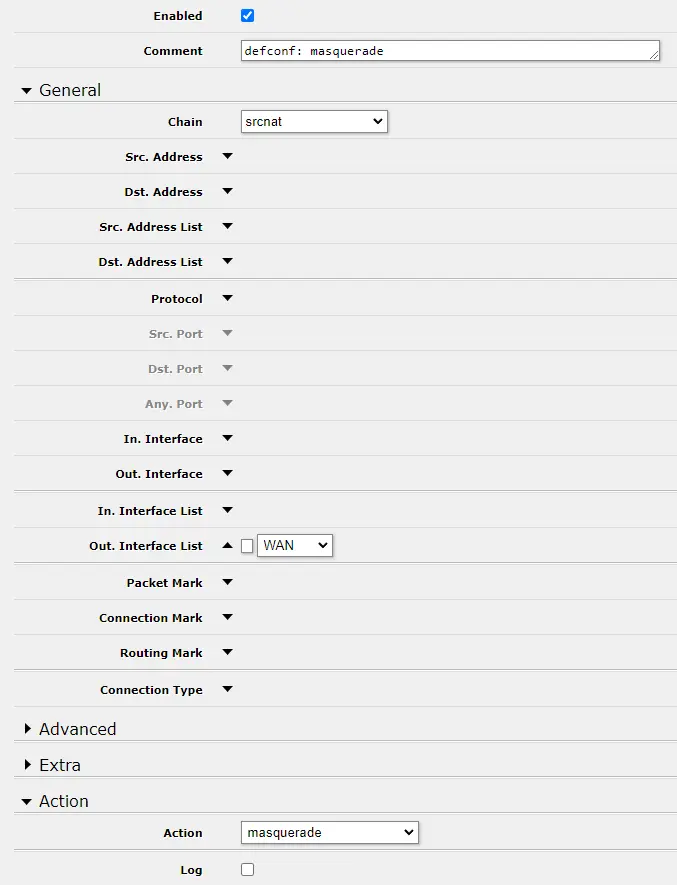 Default NAT rule at http://192.168.88.1/webfig/#IP:Firewall.NAT.1
Overview of NAT actions
dst-nat(Destination NAT): is used to redirect incoming traffic from a public IP address to a specific internal IP address and port - for example, to redirect HTTP traffic from a public IP address to an internal web server.src-nat(Source NAT): is used to change the source IP address of outgoing traffic, typically to change internal IP addresses to a public IP address when accessing the internet.masquerade: is a special form ofsrc-natthat automatically uses the IP address of the interface through which traffic leaves as the source IP for NAT.
Importance of the Order of NAT Rules
Similar to Filter Rules and others, data packets go in order from top to bottom, and once processed, they no longer proceed to the next rules in order.
TIP: If you are using VPN to access the router, keep the NAT rule for VPN in the first place.
Managing IP Addresses at the Port Level
Internet service providers, for a fee, allow the assignment of multiple public IPv4 addresses. At the router level, these addresses can then be assigned via NAT to individual ports, respectively, to the devices connected to them. The assigned public addresses need to be added to the router.
/ip address
add address=public_IP_1/Netmask_CIDR interface=ether1
add address=public_IP_2/Netmask_CIDR interface=ether1
Traffic routing through the router is set up using NAT rules. Each NAT rule directs a certain type of traffic to specific internal IP addresses and ports. For incoming connections, this involves "Destination NAT" (dstnat), and for outgoing, "Source NAT" (srcnat).
Setting up DstNAT
Assume you have 2 devices connected through the LAN ports of your router, each intended to use its assigned public IP address.
/ip firewall nat add chain=dstnat dst-address=public_IP_1 protocol=tcp action=dst-nat to-addresses=internal_IP_1 add chain=dstnat dst-address=public_IP_2 protocol=tcp action=dst-nat to-addresses=internal_IP_2- Replace
public_IP_1andpublic_IP_2with the public IP addresses assigned by your ISP. - Replace
internal_IP_1andinternal_IP_2with the addresses of the devices in your local network to which you want to redirect the traffic.
In the specification above, any incoming traffic on any port directed to the public IP address will be forwarded without any further checks. A security standard is to allow only certain ports. Here's an example of how to achieve this for HTTP (port
80) and HTTPS (port443) traffic:add chain=dstnat dst-address=public_IP_1 protocol=tcp dst-port=80 action=dst-nat to-addresses=internal_IP_1 to-ports=80 add chain=dstnat dst-address=public_IP_1 protocol=tcp dst-port=443 action=dst-nat to-addresses=internal_IP_1 to-ports=443 add chain=dstnat dst-address=public_IP_2 protocol=tcp dst-port=80 action=dst-nat to-addresses=internal_IP_2 to-ports=80 add chain=dstnat dst-address=public_IP_2 protocol=tcp dst-port=443 action=dst-nat to-addresses=internal_IP_2 to-ports=443- The
to-portsattributes with parameters80and443indicate the ports on the internal devices to which the traffic should be redirected.
Within
dstnat, it is necessary to specify exactly each port used by the end device (needed for the possibility of communication with the outside world).- Replace
Setting up SrcNAT
Analogous to the case above, we have 2 IPv4 addresses and need to ensure that each device sends packets under its assigned IP address.
/ip firewall nat add action=src-nat chain=srcnat src-address=internal_IP_1_or_subnet out-interface=WAN_interface to-addresses=public_IP_1 add action=src-nat chain=srcnat src-address=internal_IP_2_or_subnet out-interface=WAN_interface to-addresses=public_IP_2- Typically,
WAN_interfaceisether1.
- Typically,
Setting up Port Forwarding for Remote Access to Each Device Behind the Router
All devices behind the router appear externally as one IP address - the router's public IP address. Therefore, to remotely connect to a specific device located behind this router, it is not possible to use a specific public IP address (unless it has its own assigned). Instead, one can refer to a specific port of the router at that IP address. This feature is enabled after setting up port forwarding.
- Finding the Local IP Addresses of Computers - typically 192.168.X.X from the list in the
IP/APRsection (http://192.168.88.1/webfig/#IP:ARP) - Go to the
IP/Firewallsection →NATtab (http://192.168.88.1/webfig/#IP:Firewall.NAT) in RouterOS - Port forwarding is set up through a NAT rule. Specify a NAT rule for each computer you want to allow access to.
/ip firewall nat add chain=dstnat dst-address=public_IP protocol=tcp dst-port=5900 in-interface=PORT_int action=dst-nat to-addresses=internal_IP_1 to-ports=22- Chain: Select "dstnat".
- Dst. Address: Enter the public IP address of the router (or leave blank if dynamic).
- Protocol: Choose
tcp - Dst. Port: Enter the port to which you want to redirect the traffic. This port should be unique for each computer (e.g., 5900 for the first computer, 5901 for the second, etc.).
- In. Interface: Select the public interface of the router (e.g., ether1).
- Action: Choose "dst-nat".
- To Addresses: Enter the local IP address of the target computer.
- To Ports: Enter the port used for remote access on this computer (e.g., 3389 for RDP on Windows, 22 for SSH, etc.).
- Make sure your Firewall configuration (
IP/Firewall) allows the required type of traffic (RDP/SSH) for those ports
To connect to a specific computer, use the Mikrotik router's public IP address and the specific port you have set up for that computer.