VPN configuration on Mikrotik router
Regardless of which MikroTik router you have, its operating system and Router OS management interface is always the same. This wiki page describes how to set up and activate VPN on MikroTik router devices so that all devices connected to the network through this router benefit from the benefits of VPN.

What is VPN and What is it Used For?
VPN (Virtual Private Network) is a technology that enables the creation of secure and encrypted connections between two (or more) points over a public network like the internet. It serves to protect your privacy, secure data, and provide anonymity during communication and internet browsing.
The main benefits of using VPN are:
- Data Security: VPN encrypts your data transmissions, meaning that even if someone intercepts your internet activities, they won't be able to decrypt and read them.
- Anonymity and Privacy: VPN hides your IP address (your device's identification number on the internet), concealing your geographical location and identity. This is useful, for example, in bypassing content restrictions based on geographic location.
- Access to Restricted Content: VPN can allow you to access content that is otherwise available only in specific countries. Just choose a server in that country, and it appears as if you're connecting to the internet from that location.
- Public Wi-Fi Security: VPN can be useful when connecting to public Wi-Fi networks (e.g., in cafes, airports). It helps prevent potential threats, such as hacker attacks.
- Firewall Protection: VPN can also function as an additional layer of protection against malicious traffic, as many VPN services come with built-in firewall features.
Why Have VPN at the Router Level (Router-Level VPN)?
- Protection for All Devices: When you have VPN set up directly on your router, all devices connected to this router automatically use VPN without needing separate VPN configuration on each individual device. This includes devices like TVs, gaming consoles, smart home devices, and more.
- Simplified Management: You don't need to worry about configuring and maintaining VPN on each device separately. Just set up VPN on the router, and you're done.
- Network-Wide Protection: Router-level VPN provides protection for your entire home network, which is particularly useful in environments with multiple connected devices.
- Security for Devices without VPN Capabilities: Some devices, like certain smart TVs or devices with limited settings, might not have the option to set up VPN. Router-level VPN allows these devices to enjoy VPN protection regardless of their capabilities.
However, it's important to note that router-level VPN might not be suitable for everyone and can impact your network's speed and performance. Additionally, if you don't want all your device communications to go through VPN, configuration could be more complex.
VPN and Its Impact on Internet Speed
The following tests were conducted via the website https://rychlost.cz/. Tests were performed on a MacBook Air device connected to the internet via 5G Wi-Fi from a Mikrotik router. The Mikrotik router was connected to a 100MBit network through an optical cable. In the case of active VPN, the nearest VPN server was used in both cases. The VPN client was launched both at the router level and on the testing computer. In both cases, a different VPN server in the same city was connected to.
| Connection Mode | Ping [ms] | Download [Mbit/s] | Upload [Mbit/s] | IP Address |
|---|---|---|---|---|
| No VPN | 7 | 104 | 18.9 | PC |
| VPN on PC (Mullvad Client) | 27 | 70.74 | 14.82 | VPN server (PC config) |
| VPN on Router (WireGuard) | 7 | 101.0 | 19.35 | VPN server (router config) |
| VPN on Router and PC | 28 | 57.04 | 14.55 | VPN server (PC config) |
Configuration and Activation of VPN on MikroTik Router
RouterOS Update
The VPN feature is available on MikroTik RouterOS from version 7. So, log in to the MikroTik administration interface (URL http://192.168.88.1/) and in the
Systemsection →Packages(http://192.168.88.1/webfig/#System:Packages.Check_For_Updates), verify that you have RouterOS version 7 or higher. If the interface shows version 6 and you're on the latest available version, in theChannelwindow, choose“Upgrade”to upgrade RouterOS from version 6 to version 7.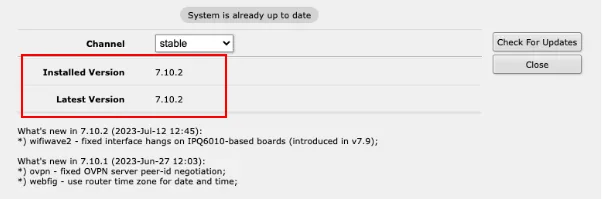
In RouterOS 7, in the
WebFiginterface, you'll find theWireGuardsection. (http://192.168.88.1/webfig/#WireGuard). We'll use this section in the following steps to configure the connection to the VPN server and then configure the router to reflect this connection during its operation (communicating with the internet through the designated VPN server).Safe Mode
Since we will be making changes to the router configuration, and there's a possibility of "breaking" something and losing access to the router or the internet, we will activate the so-called
Safe mode.Safe mode is a kind of working environment where all our actions are reflected in the router's function. However, if we don't properly exit the
Safe mode(in case something goes wrong) and disconnect from the router without ending theSafe mode, the router's configuration will automatically revert to the state it was in whenSafe modewas started.We activate Safe mode by clicking the
Safe modebutton in the toolbar.
In case we mess something up without being in
Safe mode, the typical easiest fix is to reset the Mikrotik Router to its factory settings.VPN Function Activation in Configuration
In connection with setting up a VPN, the first step is to configure the VPN service in the
Webfig/QuickSetinterface (http://192.168.88.1/webfig/#Quick_Set). This is done by checking theVPN accessfield and setting the password in theVPN passwordfield.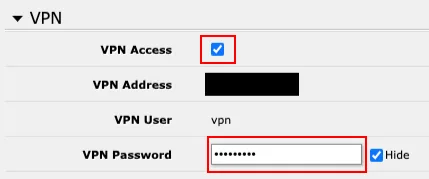
WireGuard Configuration
WireGuard is a modern and highly efficient protocol for creating virtual private networks (VPNs). It is designed to provide fast and secure connections between devices over public networks like the internet. In our case, we will use the WireGuard protocol to connect our router to a VPN server.
Configuration Details for Connecting to the VPN Server
The easiest way to use a VPN is through public VPN service providers, such as Mullvad VPN. With Mullvad, for 4.5 euros per month, you can connect up to 5 devices to the VPN server simultaneously - this includes all your household devices through your Mikrotik router and 4 additional devices.
Choosing a VPN service provider is optional, but what's crucial is providing the WireGuard configuration details to connect to the VPN server. In the case of Mullvad VPN, you can obtain these in the Downloads/WireGuard configuration section. Choose the
Linuxplatform, click theGenerate Keybutton, and then select which Mullvad VPN server locations you want to generate configuration files for. For example, chooseCzech Republic→Prague→cz-prg-wg-101. You can skip theAdvanced settingsandConfigurate Content Blockingsections. Once you've made your selections, click theDownload zip archivebutton.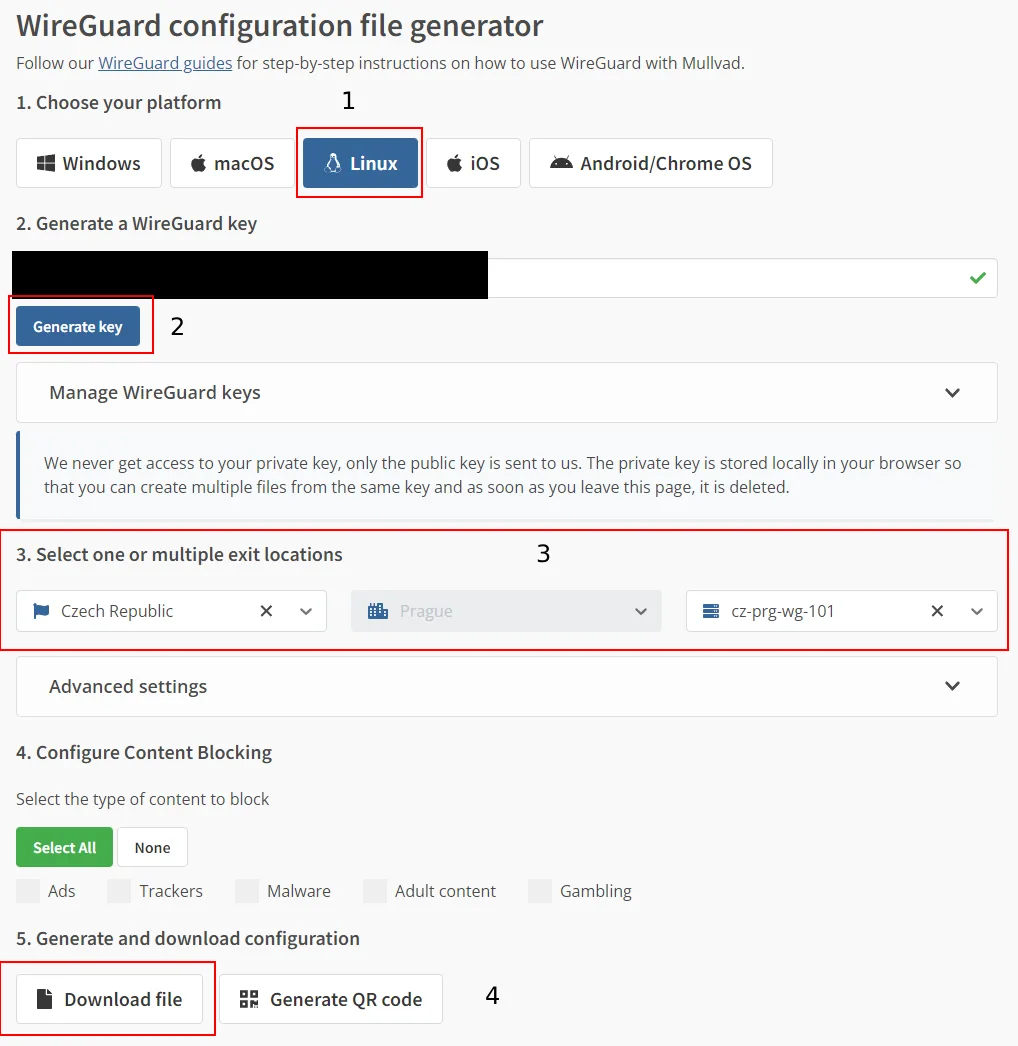
After extracting the downloaded
.zipfile and openingcz-prg-wg-101.confin a text editor, you'll find similar configuration details:[Interface] # Device: Awesome Device PrivateKey = aaaaaaaaaaaaaaaaaaaaaaaaaaaaaaaaaaaaaaaaaaaa (44 characters) Address = bb.bb.bbb.bbb/bb,cccc:cccc:cccc:cccc::c:cccc/ccc DNS = dd.dd.d.d [Peer] PublicKey = eeeeeeeeeeeeeeeeeeeeeeeeeeeeeeeeeeeeeeeeeeee (44 characters) AllowedIPs = 0.0.0.0/0,::0/0 Endpoint = fff.ff.fff.ff:51820I deliberately modified the details for easier reference. The port 51820 within the [peer] endpoint is the default port, which could have been changed in the
Advanced settingssection when configuring file preferences in the Mullvad VPN service.Wireguard Section Settings -
WireguardTabIn the Mikrotik Router interface, navigate to the
WebFigsection →WireGuard(http://192.168.88.1/webfig/#WireGuard). Here, choose theAdd Newoption to open the window for adding a new WireGuard connection.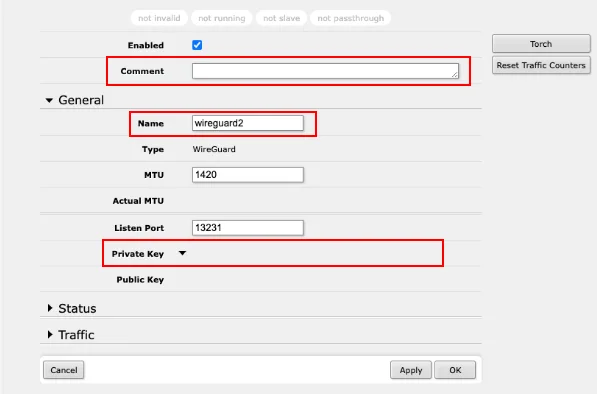
Fill in the following:
Comment- Enter information that this rule was created by us, when, and for what purpose. For example, Today'sDate-WireguardVPNName- Enter the server name (matching the name of the downloaded configuration file). Following the example, usecz-prg-wg-101PrivateKey- After expanding the arrow, insert the 44-character PrivateKey number from the [Interface] section of the downloaded configuration file (in the example file, this value is represented by the lettera)
Click the
Applybutton, which will automatically perform the following:- Assign
Actual MTUandPublic Key - Start the interface in the
WireGuardandinterfacessections
Wireguard Section Settings -
PeersTabIn the
WebFigsection →WireGuard, switch to thePeerstab. By clicking theAdd Newbutton, you'll open the window to add a new peer.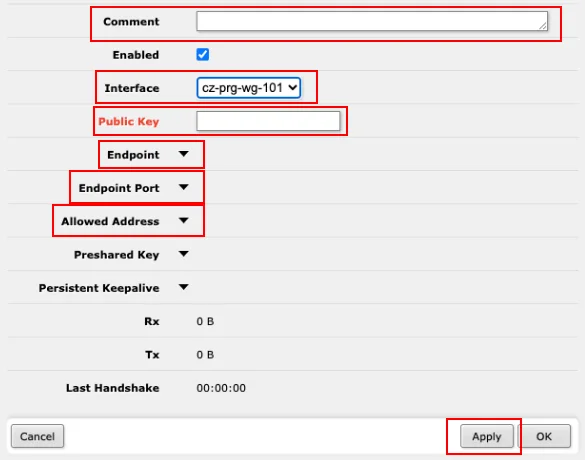
Fill in the following:
Comment- Enter information that this rule was created by us, when, and for what purpose. For example, Today'sDate-WireguardVPNInterface- Assign the interface created in the [Wireguard] tab, for example,cz-prg-wg-101Public Key- Enter the 44-characterPublicKeyvalue from the [peers] section of the downloaded configuration file (value marked with the letterein the example configuration file)Endpoint- Enter theEndpointvalue (part before the slash) from the configuration file - in the example file, it'sfff.ff.fff.ffEndpoint Port- Enter theEndpointport value (part after the slash) from the configuration file - in the example file, it's51820Allowed Address- Enter theAllowedIPsvalue from the configuration file - in the example file, it's0.0.0.0/0
Click Apply.
Adding Wireguard Interface IP Address to the Router
Navigate to the
webfigsection →IP→Addresses(http://192.168.88.1/webfig/#IP:Addresses) and click theAdd Newbutton.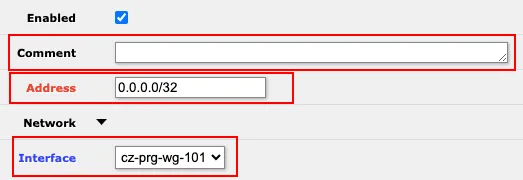
Fill in the following:
Comment- Enter information that this rule was created by us, when, and for what purpose. For example, Today'sDate-WireguardVPNAddress- Enter theAddressvalue from the [Interface] section of the configuration file. In the example file, it'sbb.bb.bbb.bbb/bbInterface- Assign the interface created in the [Wireguard] tab, for example,cz-prg-wg-101
Click Apply.
Assigning DNS Server
Navigate to the
webfigsection →IP→DNS(http://192.168.88.1/webfig/#IP:DNS).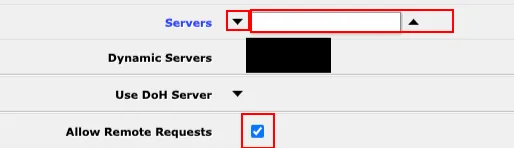
Here, expand the
Serversfield and add the value ofDNSfrom the [Interface] section of the configuration file. In the example file, it'sdd.dd.d.d. Also, ensure that theAllow Remote Requestsoption is checked. Then click Apply.Routing
Navigate to the
webfigsection →IP→Routes(http://192.168.88.1/webfig/#IP:Routes).Here, click the
Add Newbutton to open the new routing configuration window.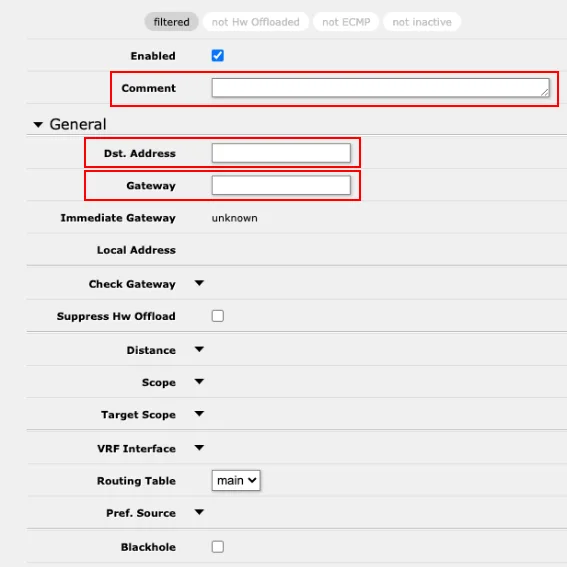
Routing
Dst. Address→VPN server GatewayAfter clicking the
Add newbutton, fill in the following:Comment- Enter information that this rule was created by us, when, and for what purpose. For example, Today'sDate-WireguardVPNDst Address- Enter the value0.0.0.0/0Gateway- Enter the WireGuard Gateway value. Typically%<name>, in the example case%cz-prg-wg-101. This value can be found in multiple places in the RouterOS interface (for example, in existing routes in the currently opened routing section). Simply locate and copy it.
Click Apply.
Default Route
In the route configuration, note that we now have two default routes with
Dst. Addressvalue0.0.0.0/0. Ideally, we would need to disable the original rule and keep only our newly added rule referring to the VPN WireGuard. Unfortunately, this route cannot be disabled through the UI, only deleted.For now, let's leave it and delete it when needed, see Section 3 - Testing IP. However, if we decide to delete it, we'll manually create an identical route and immediately set it to
Disabled. This way, if we need to delete the default route and then deactivate the VPN route, we can enable it again at any time to restore internet connectivity.If you've deleted the default route and need it later, you can create it anytime - it's a route with Dst. Address
0.0.0.0/0pointing to theImmediate Gatewayaddress of the "%ether1" Gateway.Routing
Peer VPN endpoint→Router Dst Address(optional)After clicking the
Add newbutton, fill in the following:Comment- Enter information that this rule was created by us, when, and for what purpose. For example, Today'sDate-WireguardVPNDst Address- Enter the valueEndpointwithout the port from the [Peers] section of the configuration file. In the example file, it'sfff.ff.fff.ff.Gateway- Enter the value that you find in the list of existing routes (http://192.168.88.1/webfig/#IP:Routes) as theGatewayvalue for the row withDst addressequal to0.0.0.0/0
Click Apply.
NAT Rule Configuration in Firewall
Navigate to the
webfigsection →IP→Firewall, and switch to theNATtab (http://192.168.88.1/webfig/#IP:Firewall.NAT). Here, click theAdd newbutton and fill in the following: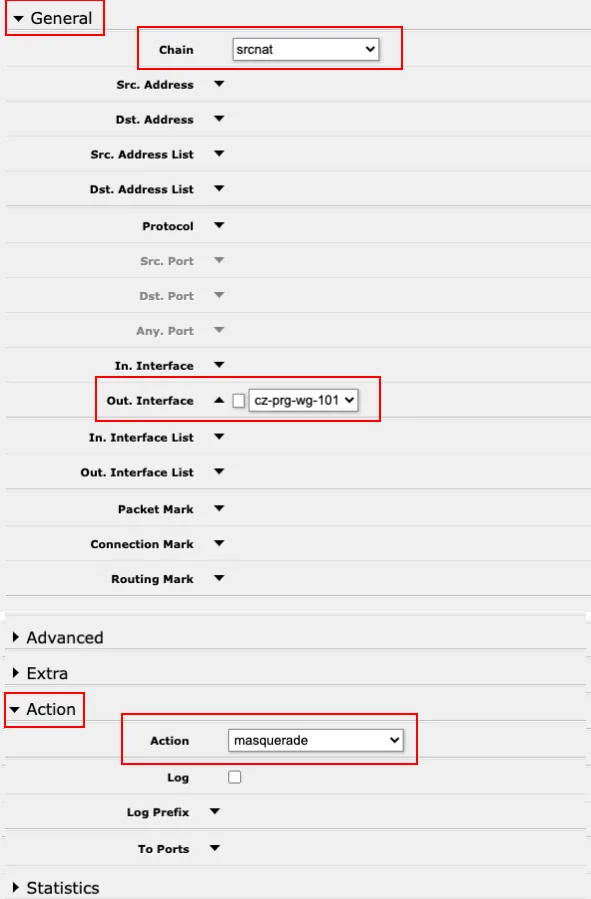
Chain= srcnatOut. Interface= Wireguard interface, for example,cz-prg-wg-101in the example configurationAction= masquerade
Click Apply
Test Your IP
Through a website like https://www.mojeip.cz/, determine your current IP address (it should be the VPN server's address). If your actual computer's IP address is displayed, the VPN is not configured correctly.
- If you still see your original IP address, it's likely necessary to remove the default routing, see section 2.9 - Default Route. However, note that if you want to deactivate the VPN, you'll likely need to restore the removed route.
If you're having trouble with the connection, you can try expanding
webfig→IP→Firewall/FilterRuleswith a new rule allowing data flow to Wireguard. Follow these steps:- In
Firewall/Filter Rules(http://192.168.88.1/webfig/#IP:Firewall), click theAdd newbutton - Choose
ChainasOutput - Use
Dst. Addressas the address of thePeer Endpointfrom the configuration file. In the example file, it's "ff.ff.fff.ff". - Choose
Protocolasudp - Use
Dst. Portfrom thePeer Endpointaddress in the configuration file. In the example file, it's51820. - Choose
ActionasAccept
- In
Deactivating the VPN
Activating and deactivating the VPN on the router can be done with a single click by enabling and disabling the route leading to Wireguard (section
webfig→IP→Routes- http://192.168.88.1/webfig/#IP:Routes), using theD(Disable) orE(Enable) button.Deactivating Safe Mode
If everything is working as expected, deactivate Safe Mode to finalize the current router configuration.
Of course, you must have Default route enabled at the same time.
If you are looking for how to enable Mullvad VPN on Ubuntu Server or PC, go to Wiki Installing Mullvad VPN on Ubuntu in 10 steps.