- Vrealmatic
- Mikrotik Router
- Quick Set
Quick Set RouterOS window on MikroTik router
No matter what MikroTik router you have, its operating system and the management interface, Router OS, is always the same. This wiki page describes the options of the Quick Set window.

Router vs Bridge Mode
RouterOS offers several modes for different types of network deployments and applications. Within the user-friendly interface for quick configuration Quick Set, there is an option to choose between Router and Bridge modes.

Router Mode
- Network Interface: In router mode, the device functions as a classic router, where each network interface (e.g., Ethernet ports) can be part of different network segments or subnets.
- Routing: The device performs routing between different network segments. This means it can route traffic between different IP addresses and subnets.
- Functions: Offers advanced network functions, such as firewall, NAT (Network Address Translation), VPN, QoS, and more.
- Segment Isolation: Allows for isolation and management of traffic between different network segments.
Bridge Mode
- Network Interface: In bridge mode, the device functions as a network bridge, meaning it connects two or more network segments at the data link protocol level (e.g., Ethernet).
- Routing: There is no IP level routing. Instead, the device acts as a transparent bridge, connecting different network segments so they appear to be one segment.
- Functions: Limited advanced network functions compared to router mode. The main function is to connect segments at a lower level.
- Segment Isolation: Does not allow for network segment isolation as in router mode, since all connected segments are considered part of one network.
For the purpose of using the Mikrotik Router to distribute internet from an internet outlet to multiple devices, leave the default option Router.
Internet Section
Choice of Address Acquisition Mode
The chosen "Address Acquisition" option defines the method by which the device acquires its IP address for internet connection.
Static
- requires manual entry of IP address, subnet mask, gateway, and DNS servers as provided by the ISP
- suitable if the internet service provider (ISP) provides a fixed (static, unchanging) IP address
- allows full control over network settings
Automatic
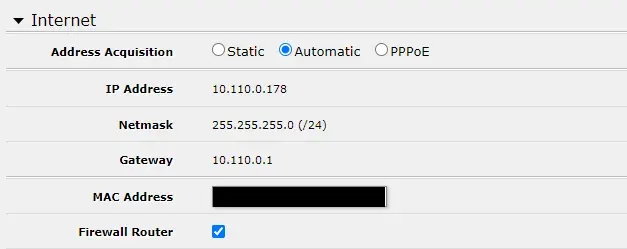
- usually DHCP (Dynamic Host Configuration Protocol) setting. In this mode, the device automatically obtains IP address, subnet mask, gateway, and DNS server information from a DHCP server, usually from the ISP.
- commonly used in home or small office networks where internet connection is dynamic and the IP address may change with each connection.
- does not require manual configuration of network parameters.
- IP
10.110.0.178in the screenshot above refers to the parent router in the network
PPPoE (Point-to-Point Protocol over Ethernet)
- used by some ISPs for user authentication and IP address allocation. Requires a username and password provided by the ISP.
- often used for DSL connections and some types of broadband connections.
- combines features of PPP (authentication, encryption, compression) with Ethernet infrastructure.
For simplicity, choose the Automatic option.
MAC Address Function
MAC address (Media Access Control address) is a unique identifier assigned to network interfaces for communication at the physical layer of the network. Each network interface, such as Ethernet, Wi-Fi, and Bluetooth, has its own, unique MAC address.
In RouterOS, the MAC address can be overwritten. This is particularly useful in cases where internet availability is tied to the MAC address of the router. Typically with fiber optics, the ISP has internet functionality tied to the MAC address of the end router. If we replace the router, the internet will not work due to a different MAC address. The solution is to contact the ISP with a request to change the record in their system to the MAC address of the new router, or overwrite the MAC address of the new router to that of the original router.
Local Network Settings
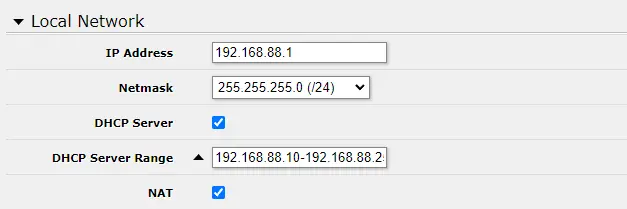
- IP Address defines the router's access address in the local network. If necessary, the value after the last dot can be changed, ensuring that the new value is within the range of IP addresses (subnet) defined within
Netmaskand simultaneously outside the range of addresses allocated by the DHCP server. - Netmask defines which part of the IP address identifies the network you are in, and which part identifies a specific device in that network.
CIDR SUBNET MASK WILDCARD MASK # of IP addresses # of usable IP addresses /29 255.255.255.248 0.0.0.7 8 6 /28 255.255.255.240 0.0.0.15 16 14 /24 255.255.255.0 0.0.0.255 256 254 /23 255.255.254.0 0.0.1.255 512 510 Complete overview can be found on the FreeCodeCamp page.
You can leave the Netmask value for the local network at the default
255.255.255.0(/24), or adjust it according to the needs of the number of devices concurrently connected in the local network. A lower value can help suppress noise. After changing theNetmaskvalue, ensure that the new range is reflected in the DHCP range. If necessary, restart the router (Webfig → System → Reboot). - DHCP Server in active state ensures that connected computers are automatically assigned an IP address (from the specified address range). The maximum number of IP addresses is defined by the
SUBNET MASKspecification. - NAT allows multiple devices in the local network (LAN) to share one public IP address for internet access.
VPN Settings

Activating VPN allows secure remote access to RouterOS. This is useful when you do not have the option of direct connection to the Mikrotik router. For home use, remote access is usually not needed - the VPN access function can be left inactive. More about the VPN function can be found in the remote access to RouterOS section.
System Section Settings

The Router Identity field defines the name of the Router.
Wireless (Wifi / Wireless) Section Settings
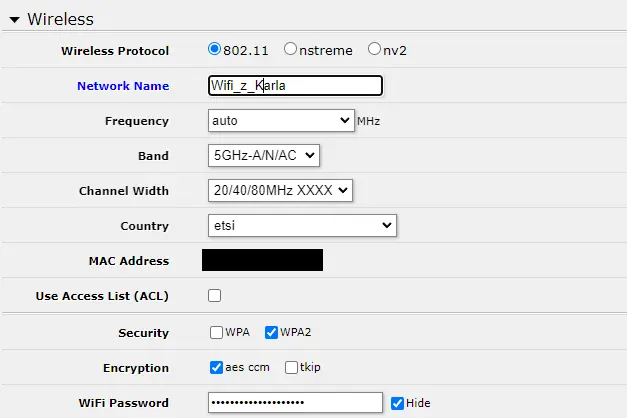
The Wireless section is used to set up WiFi. Here we choose a secure combination of security, respectively check the security method WPA2, encryption method aes com, and choose a password for WiFi.
The name of the 5G and 2G WiFi networks can later be adjusted in the WebFig#Wireless window, by clicking on the chosen network (wlan1 for 2G, wlan2 for 5G ...), then by clicking on the Wireless section and rewriting the SSID parameter. Confirm the name change with the apply button.