- Vrealmatic
- Unreal Engine Wiki
- Datasmith
Converting Models to Unreal Engine with Datasmith
Datasmith is a set of tools and plugins for importing scenes and assets from industrial and design-oriented applications into Unreal Engine.
This page provides a simple guide for exporting assets from selected software to a Datasmith-compatible format. By using Datasmith, you can achieve cost minimization associated with importing assets into Unreal Engine, that we use for the development.

Supported Software - Click to Jump to Specific Software
Procedure for Individual Software
Autodesk Inventor
In Autodesk Inventor, save files as you normally would. Formats .ipt and .iam are natively supported for import into Unreal Engine through Datasmith tools.
Autodesk 3ds Max / Design
For Autodesk 3ds Max, the most efficient way to export data is through the AUTODESK 3DS MAX EXPORTER plugin available at https://www.unrealengine.com/en-US/datasmith/plugins.
Download the plugin for your version of 3ds Max and then export your scene through the plugin.
Autodesk Revit
For Autodesk Revit, the most efficient way to export data is through the AUTODESK REVIT EXPORTER plugin available at https://www.unrealengine.com/en-US/datasmith/plugins.
Download the plugin for your version of Revit and then export your scene through the plugin.
Autodesk VRED
In Autodesk VRED, save files as you normally would. The .fbx format is natively supported for import into Unreal Engine through Datasmith tools.
Autodesk Navisworks
For Autodesk Navisworks, the most efficient way to export data is through the AUTODESK NAVISWORKS EXPORTER plugin available at https://www.unrealengine.com/en-US/datasmith/plugins.
Download the plugin for your version of Navisworks and then export your scene through the plugin.
Autodesk AutoCad
In Autodesk AutoCAD, save files as you normally would. The .dwg and .dxf formats are natively supported for import into Unreal Engine through Datasmith tools.
Autodesk Alias
In Autodesk Alias, save files as you normally would. The formats should be natively supported for import into Unreal Engine through Datasmith tools.
SketchUp
For SketchUp Pro, the most efficient way to export data is through the SKETCHUP PRO EXPORTER plugin available at https://www.unrealengine.com/en-US/datasmith/plugins.
Download the plugin for your version of SketchUp Pro and then export your scene through the plugin.
Rhino3D
For Rhino3D, the most efficient way to export data is through the RHINO EXPORTER plugin available at https://www.unrealengine.com/en-US/datasmith/plugins.
Download the plugin for your version of Rhino3D and then export your scene through the plugin.
DS SolidWorks
For SolidWorks, the most efficient way to export data is through the SOLIDWORKS EXPORTER plugin available at https://www.unrealengine.com/en-US/datasmith/plugins.
Download the plugin for your version of SolidWorks and then export your scene through the plugin.
DS CATIA
In CATIA, save files as you normally would. The formats listed below should be natively supported for import into Unreal Engine through Datasmith tools.
CATIA V4
CATIA 3D XML
DS DELTAGEN
In DS DELTAGEN, save files as you normally would. The .fbx format is natively supported for import into Unreal Engine through Datasmith tools.
Cinema 4D
In Cinema 4D, save files as you normally would. The .c4d format is natively supported for import into Unreal Engine through Datasmith tools.
Creo
In Creo CAD, save files as you normally would. The formats listed below should be natively supported for import into Unreal Engine through Datasmith tools.
Siemens NX (Unigraphics)
In Siemens NX (formerly Unigraphics), save files as you normally would. The formats should be natively supported for import into Unreal Engine through Datasmith tools.
Siemens Solid Edge
In Siemens Solid Edge, save files as you normally would. The formats listed below should be natively supported for import into Unreal Engine through Datasmith tools.
FORM•Z (Pro / jr / Student)
For FORM•Z, the most efficient way to export data is through the FORM•Z EXPORTER plugin available at https://www.unrealengine.com/en-US/datasmith/plugins.
Download the plugin for your version of FORM•Z and then export your scene through the plugin.
Allplan
For ALLPLAN, the most efficient way to export data is through the ALLPLAN plugin available at https://www.unrealengine.com/en-US/datasmith/plugins.
Download the plugin for your version of ALLPLAN and then export your scene through the plugin.
Modo
For Modo, the most efficient way to export data is through the MODO plugin available at https://www.unrealengine.com/en-US/datasmith/plugins.
Download the plugin for your version of Modo and then export your scene through the plugin.
Graphisoft Archicad
For Archicad, the most efficient way to export data is through the GRAPHISOFT ARCHICAD EXPORTER plugin available at https://www.unrealengine.com/en-US/datasmith/plugins.
Download the plugin for your version of Archicad and then export your scene through the plugin.
IFC
For IFC (Industry Foundation Classes), save files as you normally would. Output formats are natively supported for import into Unreal Engine through Datasmith tools.
iTwin Platform
For iTwin, the most efficient way to export data is through the ITWIN FOR UNREAL plugin available at https://www.unrealengine.com/en-US/datasmith/plugins.
Download the plugin from the website and then export your scene through the plugin.
Common Database (CDB) standard
For the Common Database (CDB) standard, the most efficient way to export data is through the CDB DATASMITH EXPORTER plugin available at https://www.unrealengine.com/en-US/datasmith/plugins.
Download the plugin from the website and then export your scene through the plugin.
OpenFlight format
For the OpenFlight format, the most efficient way to export data is through the OPENFLIGHT TO UNREAL plugin available at https://www.unrealengine.com/en-US/datasmith/plugins.
Download the plugin from the website and then export your scene through the plugin.
CET (Configura)
For CET, the most efficient way to export data is through the CET EXPORTER plugin available at https://www.unrealengine.com/en-US/datasmith/plugins.
Download the plugin from the website and then export your scene through the plugin.
Additional Supported Import Formats
The following table includes a list of file extensions and software that allow the export of additional supported file formats.
| Extension | Type |
|---|---|
| .sab | 3D ACIS Model |
| .sat | |
| .xml | AP242 XML Step Files, XPDM files |
| .udatasmith | DataSmith |
| .directlink | DirectLink Stream |
| .hsf | HOOPS Stream |
| .prc | |
| .iges | IGES |
| .igs | |
| .jt | JT Open |
| .xmt | Parasolid |
| .xmt_txt | |
| .x_b (binary) | |
| .x_t (text) | |
| .plmxml | PLMXML |
| .xml | |
| .step | Step |
| .stp | |
| .stpz | |
| .stpx | Step/XML |
| .stpxz |
Import into Unreal Engine
You don't need to perform an Unreal Engine import test. In case you encounter any import issues, we will contact you, and together we will find a solution. However, if you still want to see how your Datasmith-compatible model looks in Unreal Engine, you can do so as follows:
Enabling Plugins in Unreal Engine
In the menu Edit → Plugins of any Unreal Engine project, look for the “Datasmith” section and make sure that Datasmith plugins are activated.
Overview of Datasmith Plugins in Unreal Engine
- Datasmith C4D Importer = plugin for Cinema4D support in Unreal Engine
- Datasmith CAD Importer = a collection of tools for working with CAD files
- Datasmith FBX Importer = plugin for importing .fbx files from DeltaGen and VRED software
- Datasmith Importer = plugin for importing Datasmith files
- Datasmith Content = plugin containing content for Datasmith Importer
If you have activated any of the plugins, it is necessary to restart Unreal Engine to apply the changes.
Importing a Model via Datasmith
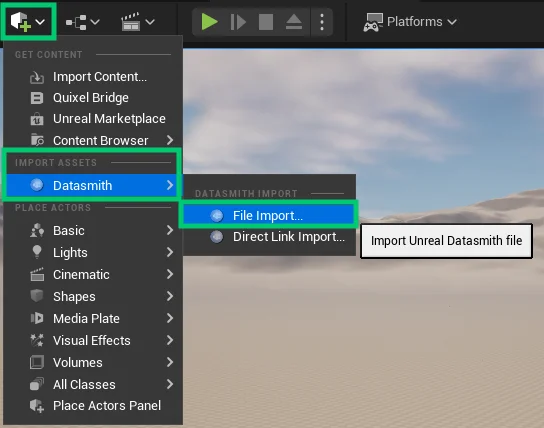
Importing files through Datasmith tools, enabled through plugins in the previous step, is done as follows through the menu Quickly Add → Datasmith.
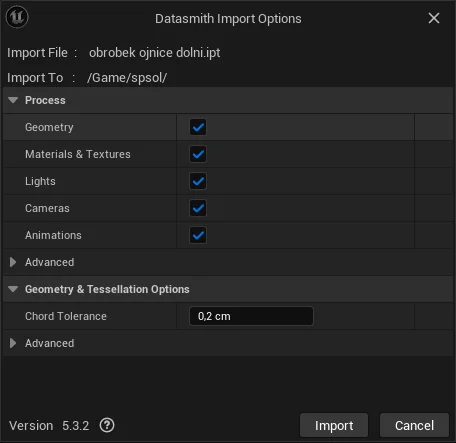
In the next step, select the files to import. You can choose multiple files simultaneously. After confirmation, import property options will appear, as follows:
You can accept the import options without changes. The models you have selected will be automatically imported and placed in the scene at the XYZ position = {0,0,0}. You can freely view and interact with the models in the scene.

Anything unclear?
We will be happy to explain everything. We will guide you step by step.